BGINFO - A Posh Recreation
Recently I have been building a lot of Windows Servers in different environments - one
Extracting and decrypting the config block from NanoCore malware

NanoCore is one of many Remote Access Trojans that are available. This particular rat is a so called premium rat which means it comes with a price tag. The current price to buy the latest version is $20. In the Authors own Words
However as this is a premium rat it is also one of the types that many coders try to crack and release, which is exactly what happened with an early release of this rat. Making it available to a much wider audience.
I have talked about some of my methods for walking through Java Rats I figured now would be a good time to walk you through my process for RATS written in .NET
The first thing we need are samples that we can work with. Wherever possible i like to generate my own samples this means i know what strings to look for such as Domain names and port numbers etc.
Fortunately in this case the Author provides a fully functional free trial. I spin up a VM with my basic tool set and Download the trial setup. Installation is fairly easy but does require some fake email accounts to register with. After getting the Controller up and running I start to generate myself a load of samples, some identical, others with different settings and contents.
I always start with the easy things first, some RATS don't bother to encrypt or encode their settings. This means something as simple as strings would reveal all althouhg unfortunately not the case with NanoCore.
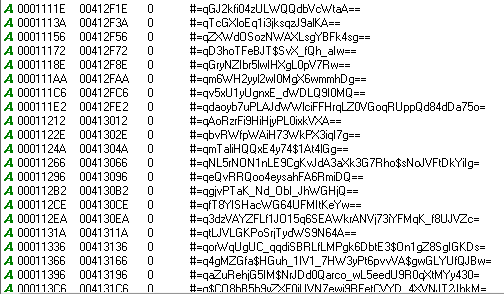
Looking at the strings does reveal something of interest. There are a lot of what seem to be base64 strings, that don't decode as base64.
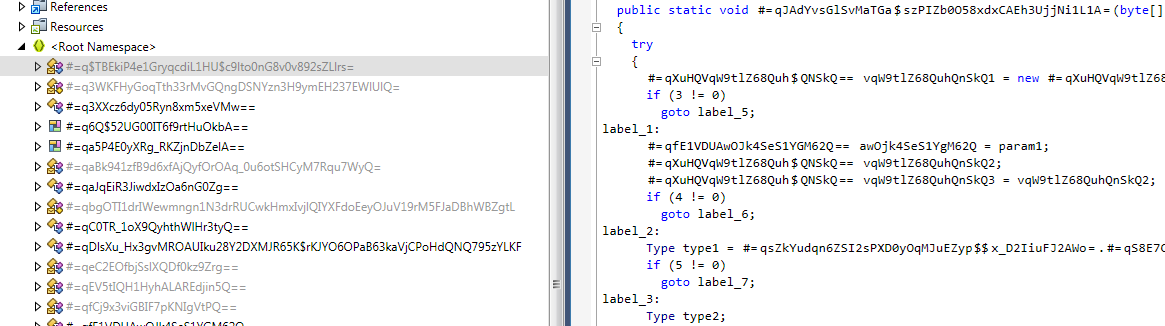
NanoCore is written in .NET. One of the better things about analyzing .NET malware is that it is easy to reverse the exe file back to readable code using a decompiler. Unfortunately the malware authors are also aware of this and introduce some tricks to stop casual observation of the code. As you can see in the image below this Author has used some sort of net obfuscator in an attempt to hide his code, both from analysis and from AV detection. This also explains the strings we saw earlier.
We could still try and make sense of the code in this obfuscated form but there is an easier way. One of my favorite tools is a dot net deobfuscator called de4dot and the source is available on GitHub https://github.com/0xd4d/de4dot. There are no compiled binaries available from the author so to save you the pain of compiling this yourself i have made the exe available here.
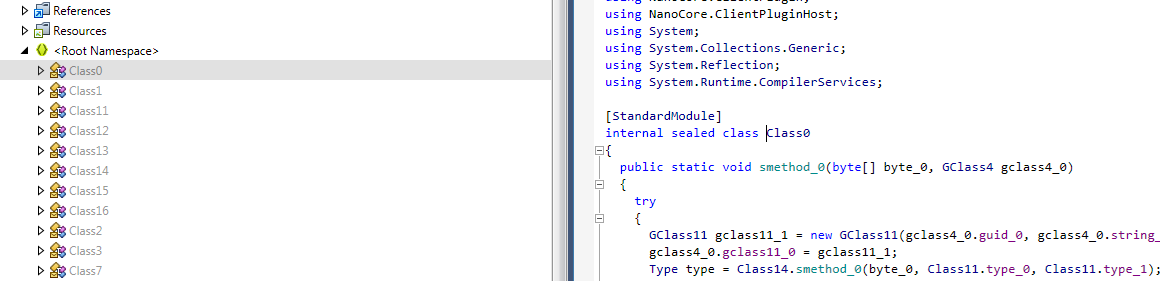
Running our sample through de4dot it indicates the exe was obfuscated with Eazfuscator.NET 3.3. After it has cleaned the code it outputs a new file and as we can see we now have something much easier to work with.
Now we have some code that we can work through lets go hunt for our config. There are a few places you can start to look for the config, you can look for the location, the encryption, the output etc. It doesn't really matter which start point you choose to look for they should all end up following the same path. I prefer to look for the location first.
I know that RATS tend to use a stub type methodology. A stub is pre generated and distributed with the rat builder. When an attacker builds his server the software injects the config in to placeholders within the stub. These placeholders typically use one of three methods:
With this in mind i grab two different samples and use vbindiff to locate any differences between the files. With this i can see a single large chunk of data that is different with each build. and doesn't change with identical builds. As this data is not at the end of the File and is not in any strings section it is most likely in a resource section. which is easy to confirm.
Each build has a randomly named resource section that contains the only differing code we identified with vbindiff. We can see from the code that it is encoded or encrypted in some way. We could start walking through debuggers to figure out whats happening but we have a representation of the source code so lets start looking through this.
Searching the code for "RC_DATA" we find this section in Class2.
private static byte[] smethod_15()
 {
 string string_0 = Class2.smethod_39(Class2.smethod_38());
 IntPtr resource = Class13.FindResource(IntPtr.Zero, string_0, "RC_DATA");
 if (resource == IntPtr.Zero)
 return (byte[]) null;
 IntPtr intptr_0 = Class13.LoadResource(IntPtr.Zero, resource);
 if (intptr_0 == IntPtr.Zero)
 return</pre> (byte[]) null;
 int num = Class13.SizeofResource(IntPtr.Zero, resource);
 if (num == 0)
 return (byte[]) null;
 IntPtr source = Class13.LockResource(intptr_0);
 if (source == IntPtr.Zero)
 return (byte[]) null;
 byte[] destination = new byte[num - 1 + 1];
 Marshal.Copy(source, destination, 0, destination.Length);
 return destination;
 }
This looks like its reading data from one of the RC_DATA sections. The section name is declared as string_o which is obtained from another function.
private static string smethod_39(int int_2)
 {
 Random random = new Random(int_2);
 string str = string.Empty;
 int num1 = 0;
 int num2 = random.Next(4, 9);
 for (int index = num1; index <= num2; ++index)
 {
 char c = Convert.ToChar(random.Next(65, 91));
 if (random.NextDouble() > 0.5)
 c = char.ToLower(c);
 str = str + Conversions.ToString(c);
 }
 return str;
 }
So the name is randomly seeded from the starting offset. This doesn't bother us too much as there is only one resource section. But if this changes in the future we can identify which section contains the config using this.
Ok so we have the section that loads in our encrypted config lets see where it gets used. Our next search is for Class2.smethod15
our search only yields one result which doesn't immediately look like it help us.
private static bool smethod_12()
 {
 byte[] buffer = Class2.smethod_15();
 if (buffer == null)
 return false;
 BinaryReader binaryReader = new BinaryReader((Stream) new MemoryStream(buffer));
 Class2.byte_2 = binaryReader.ReadBytes(binaryReader.ReadInt32());
 Class12.smethod_0(Class2.byte_2);
 object[] objArray = Class12.smethod_2(binaryReader.ReadBytes(binaryReader.ReadInt32())).object_0;
 int index1;
Essentially what this code does is:
Taking a look at Class12 everything starts to make a little sense
Step 4 Passes 8 Bytes of data to smethod_0 which is used to initialize a DES Crypto function.
public static void smethod_0(byte[] byte_0)
 {
 DESCryptoServiceProvider cryptoServiceProvider = new DESCryptoServiceProvider();
 cryptoServiceProvider.BlockSize = 64;
 cryptoServiceProvider.Key = byte_0;
 cryptoServiceProvider.IV = byte_0;
 Class12.icryptoTransform_0 = cryptoServiceProvider.CreateEncryptor();
 Class12.icryptoTransform_1 = cryptoServiceProvider.CreateDecryptor();
 }
This takes the 8 bytes and uses it as both the encryption key and the Initialization Vector. It then sets an Encryptor and a Decryptor which will be used later.
Step 7 passes The remainder of the data to smethod_2 which is the decryption function
public static GStruct0 smethod_2(byte[] byte_0)
 {
 object Expression = Class12.object_0;
 ObjectFlowControl.CheckForSyncLockOnValueType(Expression);
 Monitor.Enter(Expression);
 GStruct0 gstruct0_1;
 try
 {
 byte_0 = Class12.icryptoTransform_1.TransformFinalBlock(byte_0, 0, byte_0.Length);
 Class12.memoryStream_0 = new MemoryStream(byte_0);
 Class12.binaryReader_0 = new BinaryReader((Stream) Class12.memoryStream_0);
Looks like we have everything we need, we know where the data is, how its formatted and how its decrypted.
Its also worth noting that so far in all the samples i have generated the encryption key is always the same. I have yet to see if the key is fixed or randomly generated with a poorly implemented seed.
Now we have some information the next thing i do is run a couple of tests, before i go to far i want to see what the resulting data looks like just in case i missed or misread something along the way.
So i dont have to mess around with parsing the PE structure to get the resource data. I save the Resource sections out to its own file. This makes testing a lot easier and removes other variables that could cause me issues.
Python with the PyCrypto library is perfectly suited for this kind of task and runs nicely on windows as well as in Linux. If your wanting to run PyCrpyo on windows head over to voidspace and grab the prebuilt binaries for easy installation.
from Crypto.Cipher import DES
def decrypt_des(key, data):
 iv = key
 cipher = DES.new(key, DES.MODE_CBC, iv)
 return cipher.decrypt(data)
raw_data = open('NanoSample_resource.res', 'rb').read()
key = raw_data[4:12]
data = raw_data[16:]
with open('config_out.bin', 'wb') as out:
 out.write(decrypt_des(key, data))
This is a fairly simple test, I open the resource data and split as per the calculations we figured out above. We then pass the key and the data to our decryption routine and save the output. - I could also have printed to screen, this isn't always a good idea if the resulting output is not clear text some of the code could be interpreted as commands in the terminal.
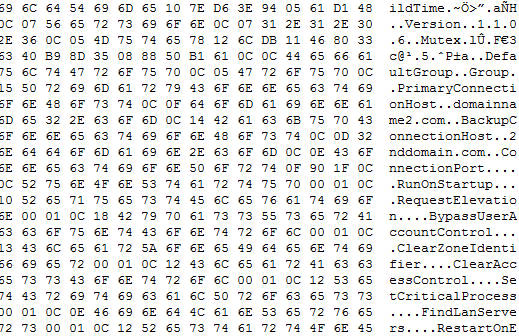
Success :) looking at our output file we see clear text strings including our domain name and other settings indicative of configuration settings.
I repeat the test against a couple more samples and everything looks great until . . .
For a couple of the samples the decoded output didn't contain any clear text strings. checking the resource section for these files it was using the same key and the same length calculations, everything was in the right place but wasn't outputting the data i wanted.
I jumped back in to the code to see what i was missing.
In my eagerness to test the decode functions i had missed a vital part of the code.
Here is the method again with some more of the code shown.
public static GStruct0 smethod_2(byte[] byte_0)
 {
 object Expression = Class12.object_0;
 ObjectFlowControl.CheckForSyncLockOnValueType(Expression);
 Monitor.Enter(Expression);
 GStruct0 gstruct0_1;
 try
 {
 byte_0 = Class12.icryptoTransform_1.TransformFinalBlock(byte_0, 0, byte_0.Length);
 Class12.memoryStream_0 = new MemoryStream(byte_0);
 Class12.binaryReader_0 = new BinaryReader((Stream) Class12.memoryStream_0);
 if (Class12.binaryReader_0.ReadBoolean())
 {
 int num = Class12.binaryReader_0.ReadInt32();
 DeflateStream deflateStream = new DeflateStream((Stream) Class12.memoryStream_0, CompressionMode.Decompress, false);
 byte[] numArray = new byte[num - 1 + 1];
 deflateStream.Read(numArray, 0, numArray.Length);
 deflateStream.Close();
 Class12.memoryStream_0 = new MemoryStream(numArray);
 Class12.binaryReader_0 = new BinaryReader((Stream) Class12.memoryStream_0);
 }
It seems that sometimes the config can be compressed. To decide whether or not to decompress the first byte is read. If its anything other than a null byte then the config is compressed. Now we know this we implement a check and deflate function and once again we get the expected output.
The only remaining steps are to walk through the decoded data and parse it in to more readable format. This is outside the scope of this post but if you are interested you can read through the decoder and see for yourself.
Which leads us nicely on to the Decoder. We have everything we need to create a standalone static decoder that will take a NanoCore Binary and extract the configuration settings.
The static decoder can be found on my GitHub or if you don't have access to your own lab https://malwareconfig.com now has this decoder implemented. It will also be implemented in http://viper.li