BGINFO - A Posh Recreation
Recently I have been building a lot of Windows Servers in different environments - one
“Hello World” It seems like so long since I last posted I felt I should say hello again 🙂
As is always the case real life and work got in the way and my ability to blog became much diminished. I am hoping to become more active again and have been playing with Google Rapid Response (GRR) again on my home network. Hunt has always been something I have had an interest in and an area I aim to become better at over time and with experience. Having a good knowledge of a system and the OS controlling it will always benefit an individual when it comes down to knowing what is bad as we must know what is normal and good!
Although through the use of Indicators of Compromise (IOC) we can make the job of the analyst much easier, allowing them to focus their time and effort on what is important instead of trudging through the white noise on a system or network.
I have been toying with some of the hunt capabilities contained within GRR on my lab server environment at home and am very impressed with how GRR has evolved since I first tested it a couple of years back when I blogged about it.
After installing GRR as a VM on my server, a process much easier now too! I installed an agent on a Windows VM on my network to start testing! I was greeted with the following screen after carrying out a blank search (I also installed an agent on my laptop).

My initial thoughts where, what would be some of the IOCs which I might generally look for and how can GRR help me to locate them on an endpoint? For the purpose of this blog post I am going to focus on locating a file that has been downloaded and believed to be malicious and a registry key known to be nefarious and used as a means of persistence.
First thing I wanted to do was to drill down onto the endpoint I wanted to investigate.
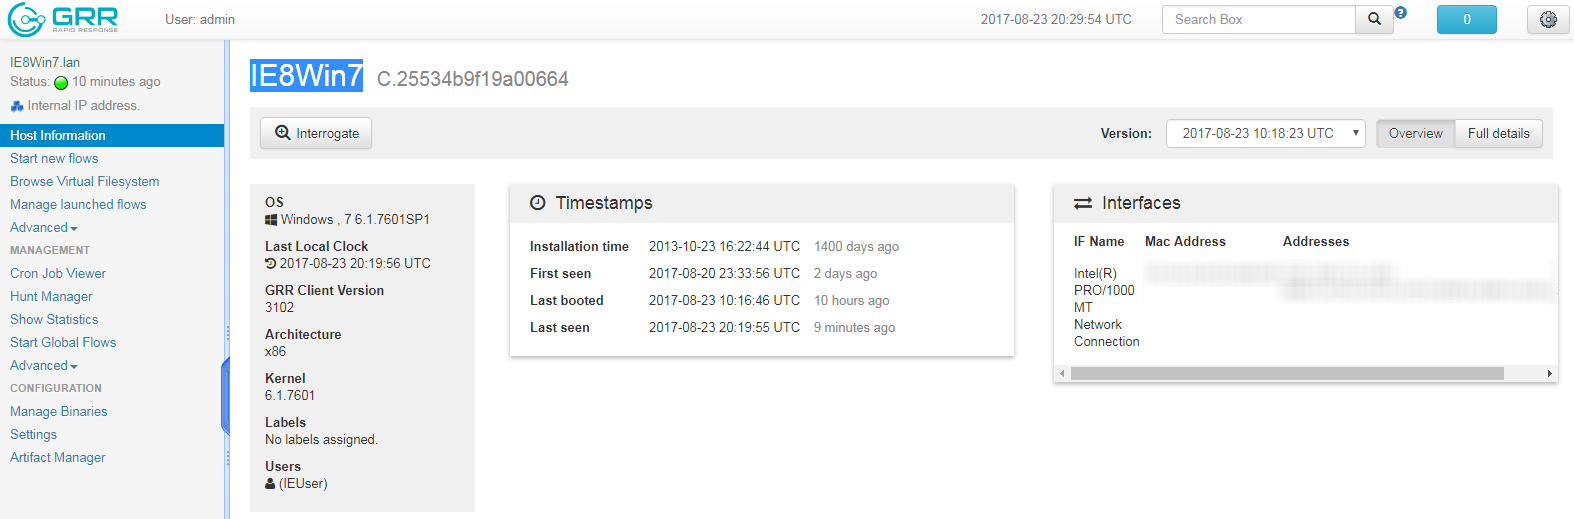
The overview above gives you the basic information but you will notice that you can click on the “Full Details” button which will provide a lot more information about the host, users, drives/volumes and hardware.
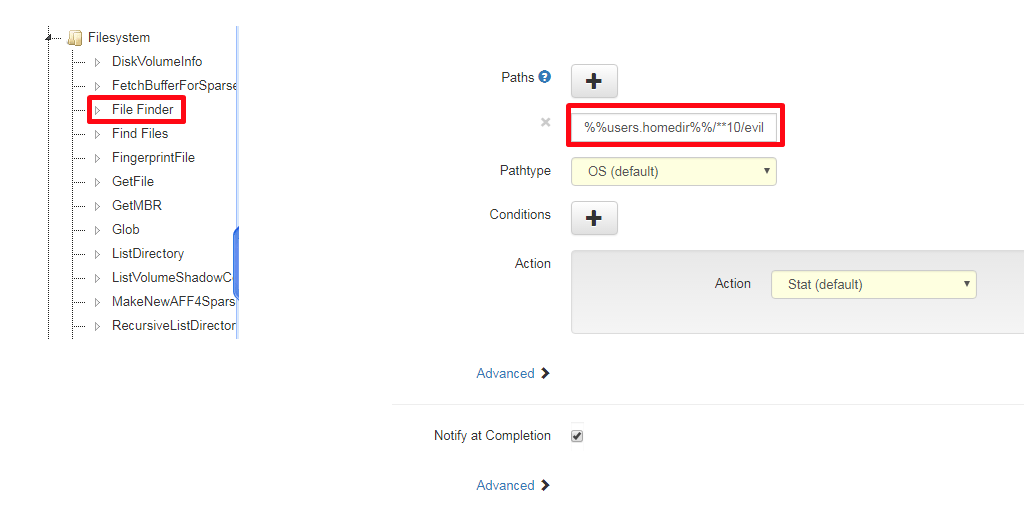
So, the first thing I want to do is locate the file I believe to be malicious using its file name and the path. There are actually 2 ways this can be done, the first is by creating what is called a flow which can be run against the individual endpoint or the second is by creating a hunt which can be run against numerous endpoints. I will detail the flow process for both of my areas of focus and then finish up by going through the hunt creation process.
Under “Start New Flows” then under “Filesystem” choose “Filefinder” Follow the below process and you will see that I input the following under path %%users.homedir%%/**10/evil.pdf
After running the above process, which shouldn’t take too long, you should receive a notification and something similar to the following.
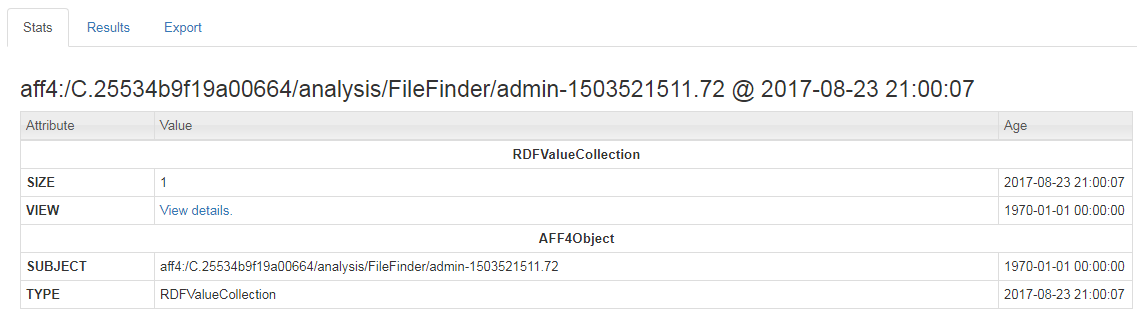
We now want to drill down a bit further into the details of the pdf which we have found by clicking on the “View Details” hyperlink which is visible on the results page.
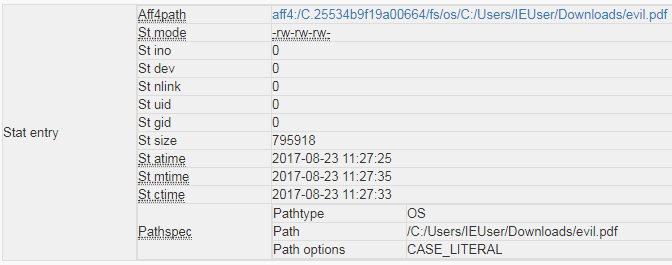
We start to see some extra detail such as the MAC times for the document and also its file path location on the endpoint file system. As is always the case though we want to know more! If we click on the new hyperlink we can see on the results we will be presented with a plethora of extra and very useful detail!
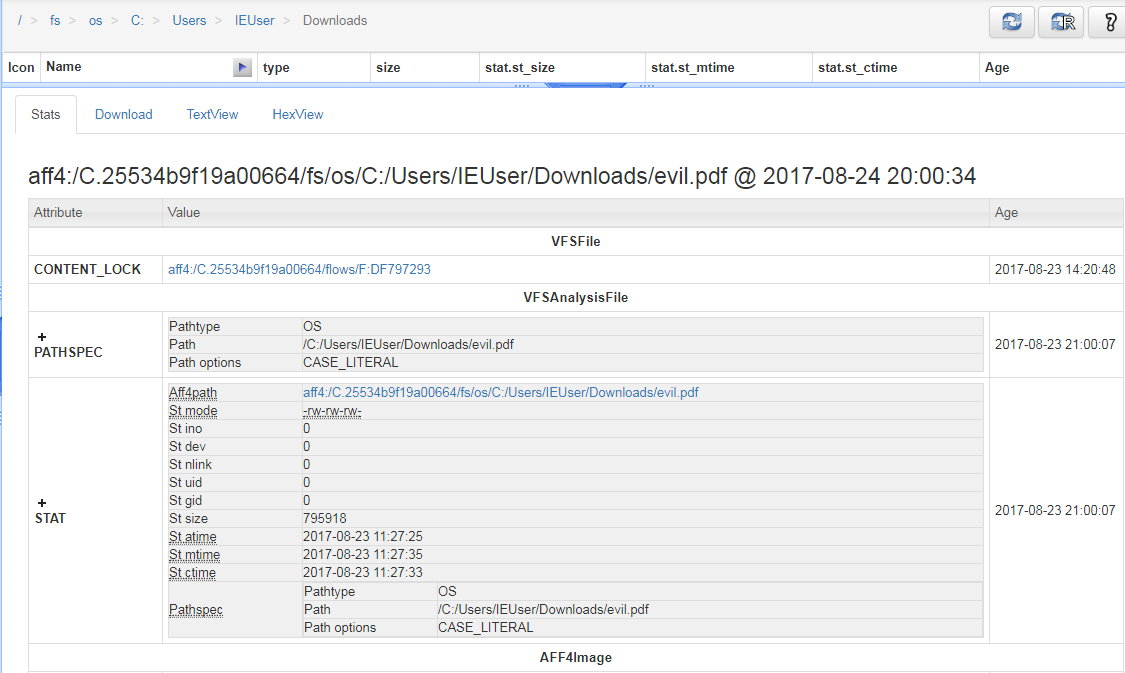
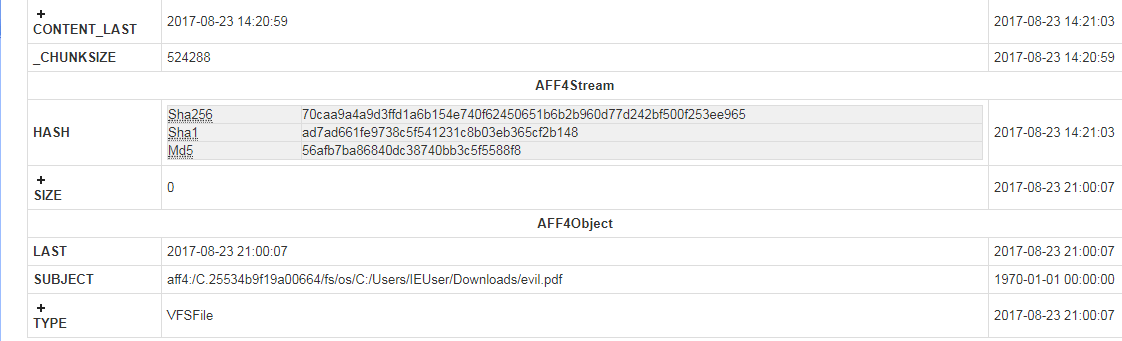
Now on this page we find that we have 3 hash values available to us! These can now be exported and used in several ways. We can use them to search a resource such as Virustotal and see if we are dealing with something that is already known to be malicious. We can also use these values to search across the network to see if it exists anywhere else. The values can then also be added to a library to be used as a blacklist to mitigate against any future downloads of this particular sample, even if it is renamed. We have already gained quite a bit of information within a few clicks without having to go to a great deal of effort.
If we want to we can also export this file back to our analysis workstation to carry out dynamic analysis and this is also a very easy process.
On the left menu, we simply click “Manage Launched Flows” this area will contain all flows that we have started.
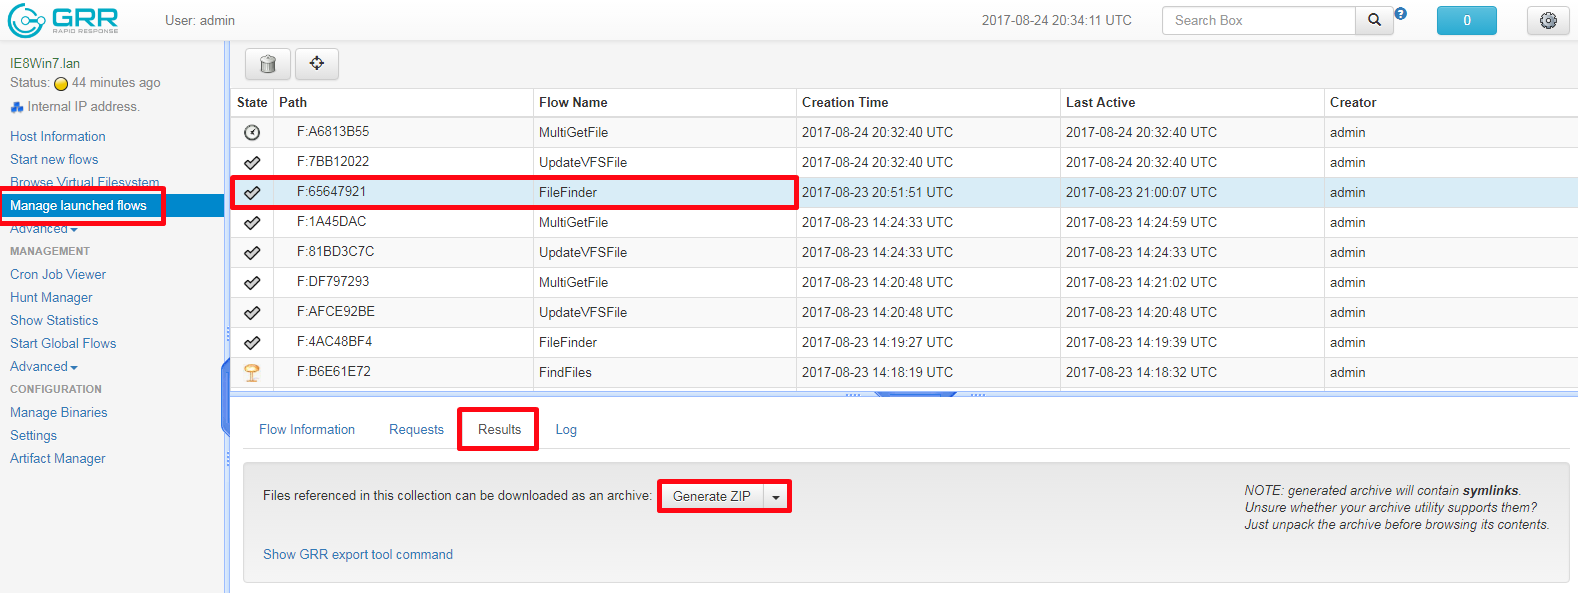
Once we click on our File Finder Flow, we move to the “Results” tab and it’s a simple case of clicking “Generate Zip”. This will as expected download a Zip file to the downloads directory of your analysis machine. You can then transfer this Zip file to your isolated malware analysis environment. Within the Zip file you will find the .pdf file nested within folders which mirror those of the file system you extracted it from.
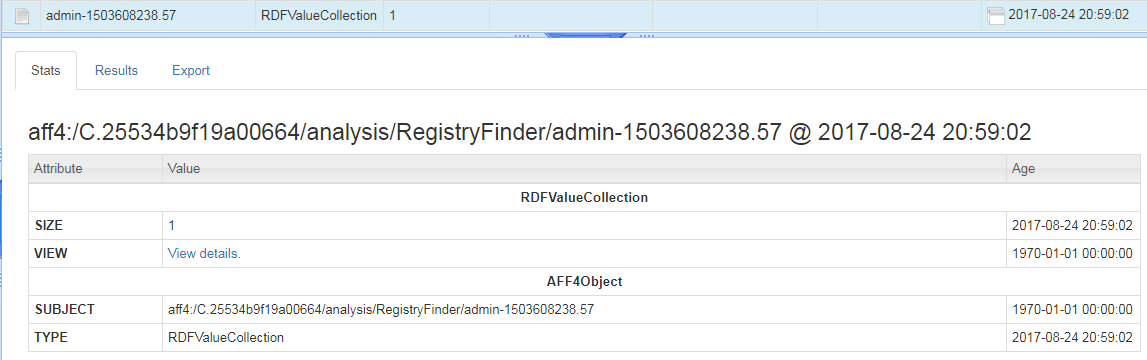
So now we have shown how to locate a file and also export it and also obtain hash values which can be used in numerous ways, we now want to move on to locating a registry key obtained from IOCs, which we know to be nefarious and a means of persistence.
Again, we use the “Start New Flow” but this time we are interested in the “Registry” then “Registry Finder” options.
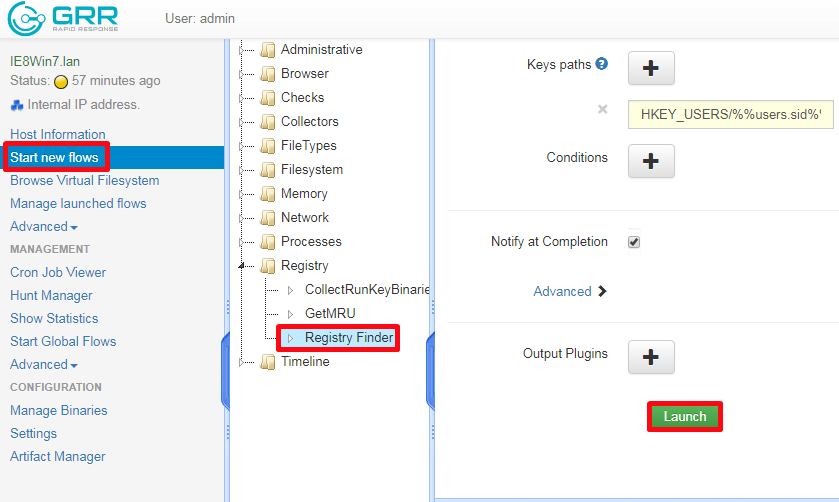
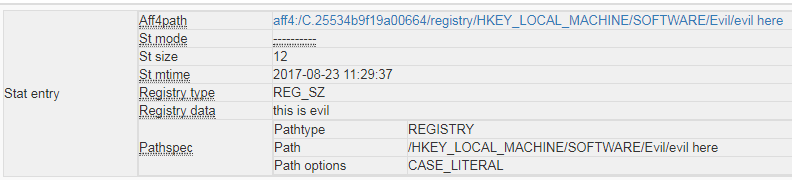
Now we know that the persistence mechanism creates a registry key within “HKEY_LOCAL_MACHINE\SOFTWARE\” called “Evil” if we know what the subkey is called we can add that but if not, we can use a wildcard as I am going to do. So, within the “key path” I will enter “HKEY_LOCAL_MACHINE\SOFTWARE\Evil\*” Once we receive a notification of completion We can view the following results
If you click on “View details” You will also see the data contained within the registry key, which in this instance is a text string of “this is evil”, but as some will know keys can also be used to contain code that malware will run.
As I mentioned in the beginning there is a way that these tasks can be automated to run across a network, I am sure you can already see where this can be very useful to analysts as automation means the analyst spends more time analysing data that actually matters!
The process we will use for this is called “hunt” and not surprisingly this is contained within the “Hunt Manager” on the left-hand tree.
It is mainly quite similar to what we have already done on the single endpoint using flows, although some extra rules are required which I will cover.
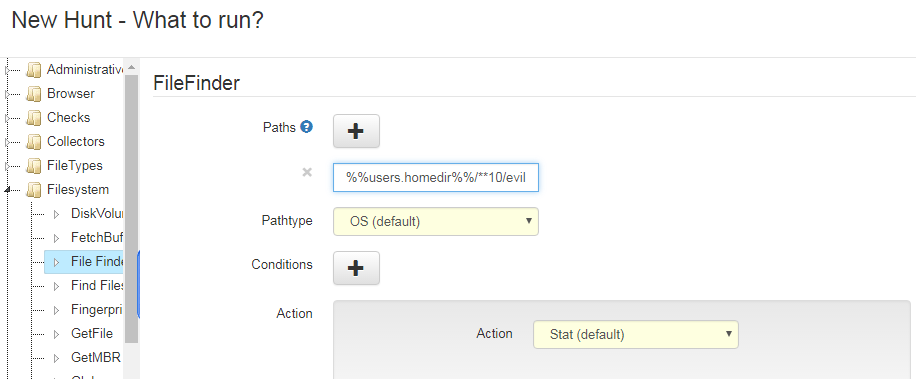
Above you will see we are looking for the same evil.pdf contained within any of up to 10 subfolder depth within the users home directory.
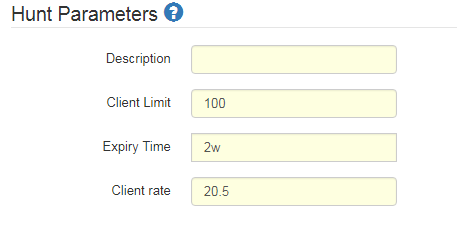
Under hunt parameters is where we will start to tailor it towards carrying out the search across our infrastructure.
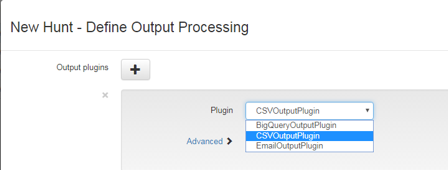
With hunt over a large number of endpoints you can imagine that the results can begin to mount up so at this point GRR offers some plugins that can be used for the results
The next screen is where we will use rules to target particular operating systems or can also be more complex, e.g. a regex match to ensure to check the that the Version attribute at / matches 2.5.2. You can also target hunts to investigate labels that are built into deployed clients via the Client.labels config option.
Once you have configured your hunt it will appear under your hunt manager where you can start any hunt you have created.

It should be noted that you can’t delete a hunt once you have run it on a client, this is for accountability reasons.
I intend to spend quite a bit more time with GRR on my network as I genuinely feel this is an excellent tool! I am looking forward to using its ability to carry out memory forensics using Rekall and will probably use my next blog post to cover what I do.
I hope you have enjoyed this post as much as I have enjoyed getting back into it and as always, any comments or suggestions are always appreciated.