BGINFO - A Posh Recreation
Recently I have been building a lot of Windows Servers in different environments - one
As I mentioned previously I am currently studying for my GCFA (GIAC Certified Forensic Analyst) exam and as part of my revision I am completing the exercises in the workbook.
One area I am enjoying very much is the timeline process. It always amazes me just how much our computers spy on us and to be honest sometimes it is scary the amount of detail that is collected on our every action! One very useful process for any Forensic Analyst/Incident Responder is the creation of a timeline. I will split this blog into 2 parts as I want to try and cover the 2 timelines available to us.
I will firstly cover the filesystem based timeline as this is much quicker to create and is something you can use for a very quick triage of the system whilst your super timeline is processing.
I am using images that were provided to me whilst attending the SANS 508 course in California led by Chad Tilbury that I was very fortunate to complete with my work colleague Kev Breen.
Firstly we will need to extract the filesystem bodyfile from the image of choice. We will use a tool we used in my previous blog called fls which we will be using to list all files and directories located in our image.
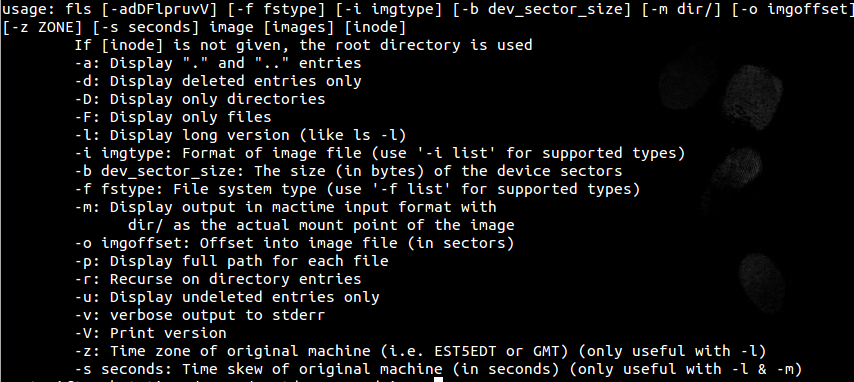
Here are the fls options explained from -h:

So I ran the following command line against the image to create the bodyfile that will be used in the next step:
root@siftworkstation:/cases/xp-tdungan-c-drive# fls -r -m C: /cases/xp-tdungan-c-drive/xp-tdungan-c-drive.E01 > /cases/xp-tdungan-c-drive/xp-tdungan-bodyfile
We will now run mactime against our bodyfile which will basically create an ASCII timeline of our system activity.
Here are the mactime options as displayed by –help

I want to create a .csv file from our bodyfile so I used the following command line:
root@siftworkstation:/cases/xp-tdungan-c-drive# mactime -d -b /cases/xp-tdungan-c-drive/xp-tdungan-bodyfile -z EST5EDT > /cases/xp-tdungan-timeline.csv
Now we have created a .csv file which we can open in Excel or a similar application.

We now have a timeline of every file and directory and can see actions on the file system related to the mac times. A quick explanation of the details in column C which relate to mac times which are the times collected from the filesystem metadata:
Some extra options for viewing which I picked up on the course are:
My next blog post will take it a step further with the creation of a super timeline which will use many more artefacts on the system such as event logs and registry. I hope people find some use from these blog posts which I am getting great benefit personally whilst studying towards my certification.